Over the past few years calls about Wi-Fi issues have increased dramatically as more devices are wireless. It is frustrating for both the caller and me. Most people want a cheap, quick and solid solution with many thinking they just need a “booster” or “extender” and it is smooth sailing thereafter. The problem is each house is unique, with its own complex set of interferences, it can be expensive to find a solution and even then may have hiccups over time. Since I have lost clients over the years because of them having persistent Wi-Fi issues, I wanted to compile this article to walk through all the ways Wifi issues can happen and what to do with them. What works perfectly for one client literally won’t go to the next room at the next. Some people move and what worked for them before doesn’t even cover half the new home despite it being smaller or same size.
About Routers and extenders
While a user in 2006 might have thought it was cool to sit on their couch without an Ethernet cord plugged into their laptop, the user of today wants to sit on the couch, in a tree house, on the edge of their property half an acre from their home office, and still get a rock-solid Wi-Fi signal to watch Netflix. Wi-Fi technology has improved greatly in recent years, but it’s not one-size-fits-all. Large office spaces with heavy traffic typically utilize Wi-Fi access points, while small offices and homes with limited users are more likely to have Wi-Fi routers and range extenders, everything has pro and cons as discussed at near the bottom.
The most important is placement and distance, don’t assume any router will work for your house and devices. Almost everyone who has Wifi issues has the router tucked away and out of sight in a corner or closet.
Netgear Extender Manual Setup: Without Ethernet Port
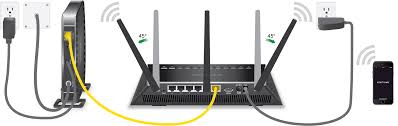
There are a number of extenders available in the market today and almost all of them are different. Some my wifi extender models do not have an Ethernet port. As a result, a number of users struggle to complete the Netgear WiFi extender manual setup due to the lack of an Ethernet port.
As a result, you may be unable to load you’re the default web page. Are you facing a similar issue? Need not worry, simply follow the instructions below to troubleshoot and access the Netgear wifi extender login page.
Follow the steps given below to complete new Netgear extender setup and login without Ethernet port.
1.Reset your wireless device to its default factory settings.
2.Now get connected to the device via a WiFi connection.
3.Next, log in to your device’s web user interface.
4.Now you will be asked to fill in the username and the Netgear extender default password.
5.In case you need help with your 192.168.1.250 Netgear_ext device, you may contact us using the chat window given at the bottom of this page or call 1-866-606-3055 (toll-free) and one of our certified technicians will guide you through wifi extNetgear range extender login and setup process.
6.Next, follow the prompts of Netgear installation wizard carefully for local IP address 192.168.1.250 and establish a successful connection with your existing router.
7.Finally, connect all your WiFi devices to the network you just set up.
Still facing troubles in completing the process?
Our dedicated support team will help you set up your device in minutes. We have an experienced team of certified technicians who work with utmost dedication to resolve all your technical issues and queries in the most professional and timely manner.
How to Set Up netgear wifi range extender
The device comes with a simple-to-understand Netgear Extender manual which you can use to learn about your device. You can perform the installation in two ways. The first way is to use your web browser and the second method is the WPS Push method.
Web Browser Method
- Bring your Netgear WiFi Range Extender to the same room in which your router is kept.
- Power it on and wait until the LED turns green in color.
- Head to your computer and launch an internet browser.
- Access the website http://www.mywifiext.net.
- Click the button: New Extender Setup.
- From the list of networks, select the one you want your extender to connect with.
- Click Next.
- Give a name (SSID) and password to the extender’s network.
- Click Next.
- Connect a WiFi device such as a smartphone or laptop with the extender.
- Click Continue.
- Click Next on the browser to finalize the registration.
- Click Finish
Now, as your Netgear extender setup is done, you can connect as many WiFi devices as you want with the extender and place the extender to a different area. Just keep in mind that the extender’s placement must be between the router room and the room in which you have your WiFi device. The Netgear extender manual also mentions a second method which is WPS Method.
